- How can we help?
- +1 800-320-0230
- 225-927-8917
- info@bayoustatelab.com
From Chair to Lab to Seat: A Step-by-Step Guide for Great Abutment Restorations

Building Patient Trust and Case Acceptance in Cosmetic Dentistry
September 2, 2025
Top 5 Mistakes That Lead to Remakes and How to Prevent Them
September 16, 2025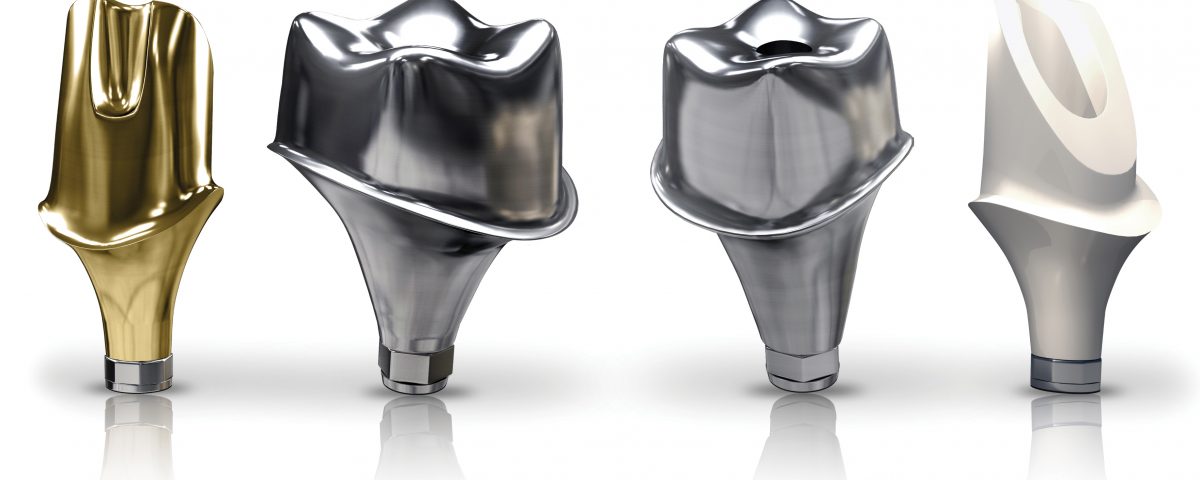

1) Start With the End in Mind (Treatment Planning)
Decide restoration type and communicate it clearly on the Rx:
- Screw-retained crown (preferred where feasible to minimize cement risk).
- Cement-retained crown on a custom abutment (when angulation/esthetics require).
Send us:
- Implant brand, platform diameter, connection type (e.g., internal hex, conical), and site(s).
- Desired emergence profile (concave/straight), margin position (cement-retained: typically 0.5–1.0 mm subgingival facially; supragingival interproximally when possible).
- Custom titanium abutment (standard or gold-hue),
- Zirconia abutment with Ti-insert,
- Hybrid abutment crown (lithium disilicate/zirconia bonded to Ti-base).
- Crown material (monolithic zirconia, layered zirconia, lithium disilicate), shade, surface texture/gloss preference.
- Occlusion scheme (light centric, anterior guidance, canine guidance, group function), and contact tightness preference (e.g., "firm proximal contacts; shimstock-hold centric").
- Tip: When in doubt, tell us your clinical constraint (limited interocclusal space, high smile line, tissue biotype, implant depth), and we'll propose the safest material/design.
2) Shape the Tissue First (Provisionalization)
If you're not immediately restoring:
- Place a contoured provisional/healing abutment to sculpt soft tissue to the desired emergence.
- Keep contours concave at the cervical to protect the tissue.
- Once tissue is stable, capture the exact shape in your impression/scan (see next step).
- What we need: Photos of the healed emergence form and any provisional contours that worked well, plus your goal for the final papilla heights and zeniths.
3) Capture the Implant Position & Emergence Profile
A) Digital Workflow (Preferred)
- Scan sequence (single unit):
- Pre-scan the tissue with the healing abutment in place (soft-tissue reference).
- Remove healing abutment → place the correct scan body (brand-/platform-specific) and hand-tighten per manufacturer.
- Scan the arch with scan body (ensure full 360° capture of the scan body, platform, and surrounding tissue).
- Scan opposing arch.
- Do a buccal bite (MIP).
- Data we need in the export:
- Upper/lower scans, bite, and implant library mapping (most IOS systems embed this automatically when the correct scan body is selected).
- Shade with tab in the same plane as the tooth (one well-lit, one diffused; add cross-polarized if available).
- Stump shade (when translucency matters).
- Full-face smile/midline and retracted views for esthetics.
- Common pitfalls to avoid:
– Using the wrong scan body or not fully capturing its geometry/QR marking.
– Not scanning the soft-tissue collar after removing the healing abutment.
– Segmental/scant scans that miss neighboring contacts.
B) Conventional Workflow
- Implant-level impression (preferred):
- Open-tray impression coping, rigid tray, heavy-body/medium + light wash.
- Verify coping engagement and impression venting.
- Impression, implant analog, opposing impression/stone or printed model, accurate bite record.
- Shade photos (as above) and provisional or a matrix of its emergence if available.
For multiple units or a full arch, request an implant verification jig—we'll provide or instruct fabrication.
4) Write a Complete Rx (What to Tell the Lab)
Copy/paste and fill in:
- Tooth/implant sites: #___
- Implant: Brand ___ | Platform ___ | Connection ___
- Restoration plan: ☐ Screw-retained crown ☐ Cement-retained on custom abutment ☐ Hybrid abutment crown
- Abutment material: ☐ Titanium ☐ Gold-hue Ti ☐ Zirconia w/ Ti-insert ☐ Ti-base (hybrid)
- Margin target (cemented): Facial ___ mm subG | Interprox ___ mm | Lingual ___ mm
- Emergence profile: ☐ Concave ☐ Straight | Special request: __________
- Crown material/shade: __________ | Stump shade: __________
- Contacts/occlusion: Proximal: ☐ Light ☐ Firm | Occlusion: ☐ Light centric ☐ Shimstock hold | Guidance: __________
- Screw access preference (anterior): ☐ Lingual ☐ Angle correction if needed (max ___°)
- Esthetic notes: Midline, incisal edge, texture/gloss: __________
- Delivery preferences: Access fill: ☐ PTFE + composite ☐ Other: __________
5) Send the Case Smoothly
We accept all major intra-oral scans (TRIOS, iTero, Medit, CEREC, Planmeca, etc.). Send via the native portal or export open STL/PLY (include both arches + bite + scan body data).
File naming: Dr_Last-Patient-#Site-ImplantBrand-Date.
Physical shipments (if conventional)
- Protect impression copings and analogs from movement; separate small parts in labeled bags.
- Include a printed Rx and any photos on a USB (or email them to info@bayoustatelab.com referencing the case name).
6) What We Do in the Lab (Design & Verification)
- Library match: We confirm implant platform and scan body ID/rotation.
- Emergence design: We mirror your tissue anatomy; cervical profiles concave for cleansability.
- Margin control (cemented): We position margins per your Rx to reduce residual cement risk.
- Material selection:
- Custom Ti (or gold-hue Ti) for strength, precision, soft-tissue friendliness.
- Zirconia abutment for esthetics in the anterior (with Ti-insert for strength).
- Hybrid abutment crown when minimal space or superior esthetics needed.
- Screw access: We evaluate angulation; if needed and approved, we use angle-correcting solutions within safe limits.
- Verification: We provide annotated screenshots or a design approval PDF upon request.
7) Try-In & Delivery (Chairside)
For Screw-Retained Crowns
- Seat restoration; verify passive fit and complete seating.
- Check proximal contacts (floss feel) and occlusion (MIP + excursions).
- Torque the screw to the manufacturer's specification (use new screw if provided).
- Block the access with PTFE tape; seal with composite.
- Final radiograph to confirm complete seating and clearance.
For Cement-Retained Crowns on Custom Abutments
- Try-in abutment first; verify margin position/cleansability and gingival health.
- Torque abutment screw per manufacturer; radiograph to verify full seating.
- Try-in crown; adjust occlusion/contacts as needed.
- Isolate and cement with a radiopaque cement; minimal quantity.
- Floss and instrument to remove excess; confirm on bite-wing/PA.
- Post-op hygiene guidance for the patient.
Retrievability tip: If you anticipate future access, ask us to keep margins as supragingival as esthetics allow, or choose screw-retained.
8) Common Pitfalls & How to Avoid Them
- Wrong scan body or incomplete capture → Double-check platform and scan body type; scan 360° and verify in preview.
- No soft-tissue data → Always do a tissue pre-scan before placing the scan body.
- Deep margins (cemented) → Request custom abutment with elevated margins and communicate desired depths per surface.
- Insufficient clearance → Include opposing and bite; if space is tight, tell us—hybrid abutment crown may be ideal.
- Shade surprises → Send stump shade and calibrated photos; note surface texture and incisal characterizations you want.
9) Quick Chairside Checklist (Print This)
- ☐ Implant brand/platform/connection confirmed on Rx
- ☐ Provisional/tissue contours documented (photos)
- ☐ Digital: Tissue pre-scan → correct scan body → arch/opposing/buccal bite
- ☐ Conventional: Open-tray impression + analog + rigid tray
- ☐ Shade photo(s) + stump shade + smile/midline refs
- ☐ Occlusion/contact preferences stated
- ☐ Restoration type & abutment material selected
- ☐ Shipping/portal upload with clear file names
- ☐ Ask for design approval images if desired
10) When to Choose Which Abutment (At-a-Glance)
- Posterior strength / limited space → Custom Titanium (gold-hue option for esthetics at the collar).
- High-smile-line anterior → Zirconia abutment (with Ti-insert) + layered/esthetic crown.
- Very limited interocclusal space / one-piece convenience → Hybrid abutment crown on Ti-base.
- Cement risk high → Screw-retained when angulation permits.
We're Here to Collaborate
As a full service certified dental lab, with certified technicians in every department, and over 40 years serving dentists, we're committed to craftsmanship, communication, and integrity. We're faith-led, which for us means serving you and your patients with excellence and honesty, every case, every time.
")
